

Intro and Musings
You know the drill. Spin up new server, create username, create password. Use system, forget password, search for “Linux password reset.” OR, use something like SecureCRT that can store the password…use system, forget password, can’t use SUDO, search for “Linux password reset.” Fun times. Even with a password manager this can be a PIA. There’s a better way. Use an encrypted keypair.
Note: I will not be talking about SSH keypairs on routers or switches. I’m focusing on Linux OS, it’s more straightforward.
What is SSH?
Let’s start with “what is telnet” first. Both are ways to remotely log into a system and work with it. Think “RDP for Cavemen”. Telnet and SSH can do largely the same thing, but Telnet is horribly insecure. Everything sent over the wire is cleartext, with no authentication verification.
You may as well stand on your chair and yell out your password while logging in. But for a long time, “this was the way.” And then a better way came along. Secure Shell, also known as SSH.
SSH in comparison, will establish an encrypted session before credentials are transmitted, and then once the user is validated everything over the wire is encrypted. Vastly more secure.
Now, you’ve been using an encrypted keypair every time you’ve used SSH but you probably didn’t realize it, just not for authentication.
The Process
Let’s kick off a SSH session to a server we haven’t talked to before.
I’m sure you’ve seen this before. It’s the “yea yea yea” get out my way, let’s do this. You accept and save, and never see it again.

But let’s take a closer look. This is the server, reaching out to your client saying, “this is who I am. This is the public key I give everybody so you know that it’s me.” It’s what your side uses to help create the encrypted session before authentication.
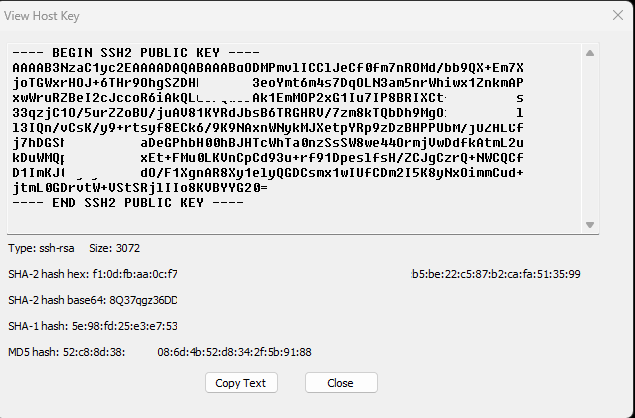
You can have your client store the key locally, so you don’t have to accept it every time. There is no “private” key for us to manage in this use case. We are only accepting to encrypt our communication to the server, not authenticate as a user.
NOTE: This process is reversed for authentication. The server will have our public key in its store, and we use our private key for a challenge-response. More on this later.

Now if we choose password authentication, once the session is established the credentials are securely sent across the wire to the server to validate. It’s important to note this. “credentials are securely sent across the wire to the server to validate”
That does give a malicious actor an opportunity. Keyloggers, malware. Grabbing credentials from memory. There is a non-zero chance of compromise.
Let’s take a look at a packet capture.
Note: I am glossing over a whole hell of a lot here.
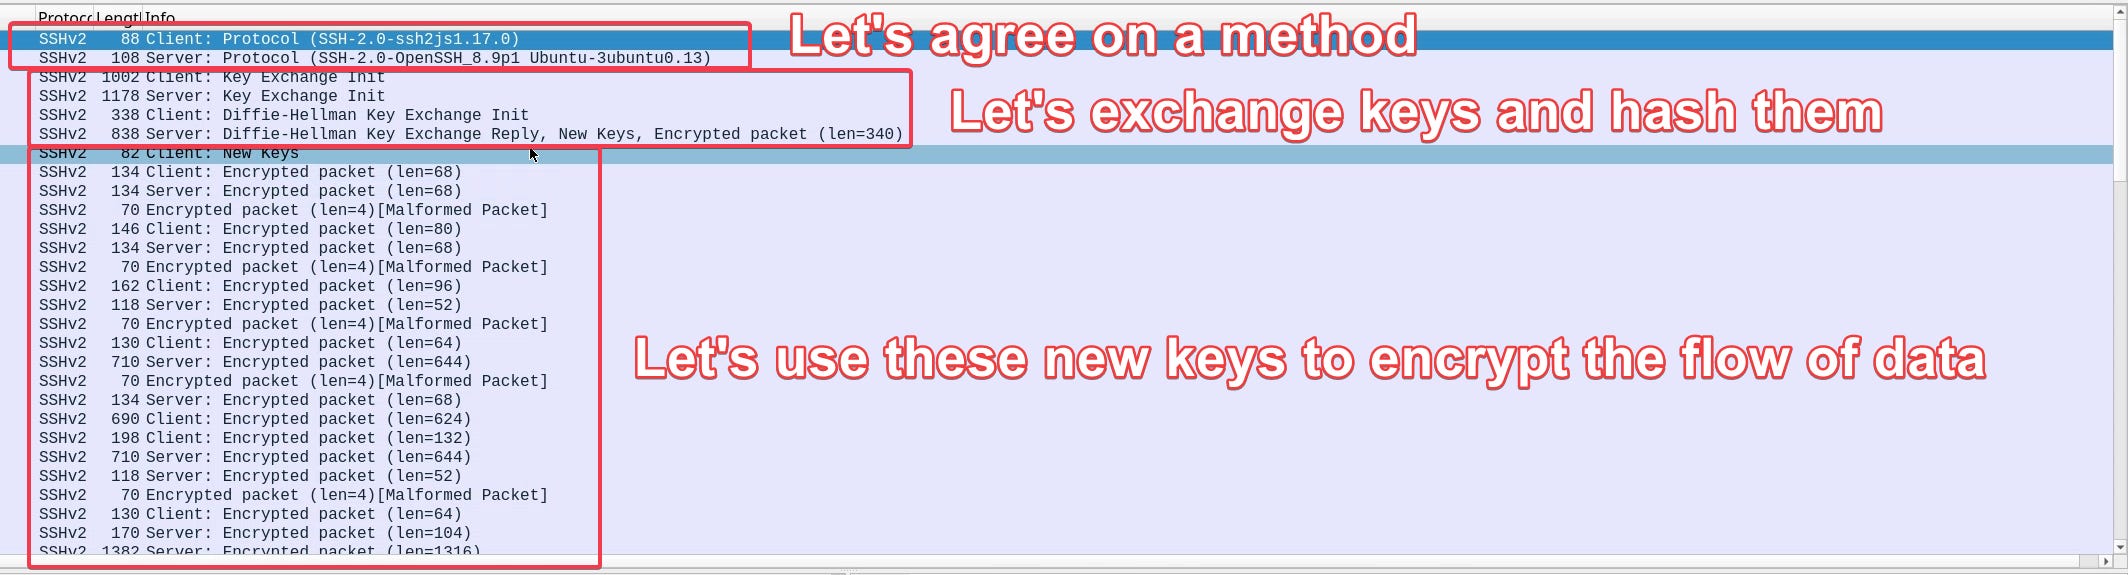
So our initial connection, and our subsequent data is safely snuggled up in an encrypted session. Now let’s talk about key pairs.
Key Pairs
Let me start with what key pairs are not. Key pairs are NOT certificates. Certificates utilize encryption schemes to secure data but there’s a lot more to it. Certificates are key pairs that have embedded metadata, and require a Certificate Authority for validation. SSH Keypairs will have none of that.
With SSH keypairs, there will be a public key and a private key. The public key can be given to anyone, but your private key is the one you must keep secure at all times. You will need both the public and private key, while the server only needs the public.
With keypairs, no private credentials are sent over the wire. The username and a key identifier are sent to the server. The server checks to see if the public key is in the “authorized keys” section and if so, sends a challenge back to the client.
The client uses the private key to sign the challenge and returns it. The server uses the public key to validate the challenge (which can only be signed by someone with the private) and if validated logs the user in.
The important part here is that no “credentials” were ever sent. Just an encrypted challenge. And this is a unique conversation every time. Nothing is stored or repeated.
OK now that we’ve covered some history and process, let’s get this going.
Generating Key Pairs
So there’s any number of ways to generate a keypair. You can use putty, Secure CRT, OpenSSH, but recently I’ve found a drop dead simple way that not only lets you create pairs but easily and securely store them.
Bitwarden. How long did I not know this was a feature?!
In the vault, right there, staring me in the face.

Simply click “add”
Holy crap. That was easy. Let’s copy these values out to two files.
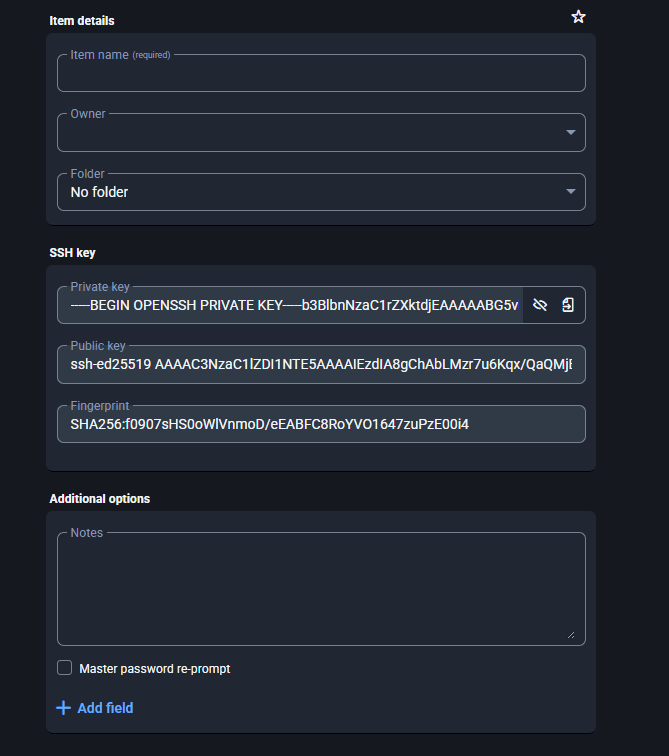
The public to a .pub and the private to a file with no extension. The names must be the same. If you take a look at each they look very different.


Note how the private actually says “Private Key”
Installing the Public
Ok, let’s go over installing a key at install and after install.
After install: so the public must go into the “Authorized Keys” file under the user profile. Here’s a super easy script. mkdir -p ~/.ssh
chmod 700 ~/.ssh
echo “your-public-key-here” >> ~/.ssh/authorized_keys
chmod 600 ~/.ssh/authorized_keys
If you paste in the public key in the echo, it’ll throw it right in there for you. Easy peasy. Feel free to cat the file to validate.

NOTE: if you’re on a Linux or Mac workstation with OpenSSH, ssh-copy-id does all of this in one command.
ssh-copy-id -i ~/.ssh/mykey.pub user@server
Now, let’s setup the client. I’ll use SecureCRT, but the process isn’t terribly different for other clients.
Move public key to the top, don’t forget to put the correct username in.
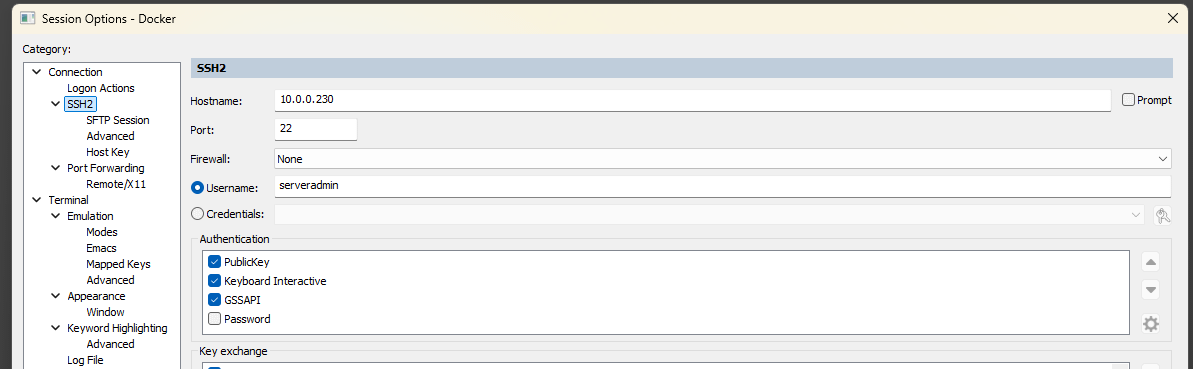
Point it to the folder with the pair
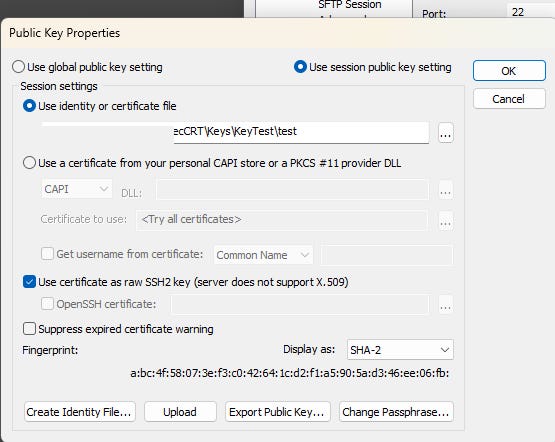
Hit ok, and if all was right you’ll pop right into the session! Let’s look at the log with:
sudo tail -f /var/log/auth.log
Oct 25 19:07:55 prod-docker sshd[2784705]: Accepted publickey for serveradmin from 10.0.0.56 port 63171 ssh2: ED25519 SHA256:StqvGmDA6rxPWAc+88BCZBzS8aWQWtNG7gb7uFf
Oct 25 19:07:55 prod-docker sshd[2784705]: pam_unix(sshd:session): session opened for user serveradmin(uid=1000) by (uid=0)
Oct 25 19:07:55 prod-docker systemd-logind[722]: New session 283 of user serveradmin.
Right there you can see we’ve successfully SSH’ed in! Wait, but what about sudo? Now in Debian sudo isn’t a thing, but in Ubuntu it is. And we’re trying to get away from typing out credentials, right? Easy fix.
Using our credentials one last time, let’s su to root and sudo visudo.
NOTE: This is a convenience thing and represents a downgrade in security. While suitable for a home enterprise, I might not do this in Prod at work since you’ll likely be against your security policy.
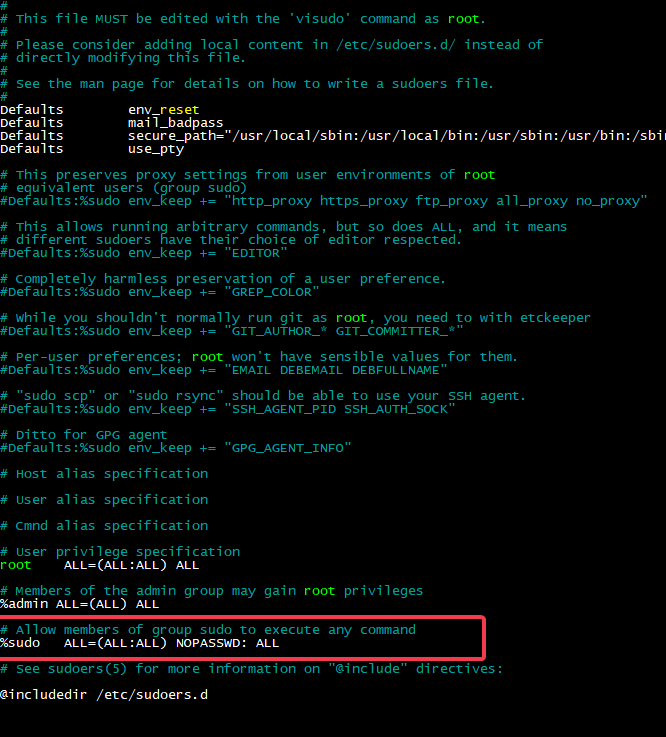
Change that line to %sudo ALL=(ALL:ALL) NOPASSWD: ALL as shown above. Log out, log in and you should be able to sudo nice and easy.
Note: You will still need that password to login if using the direct console! Don’t lose it!
Usage and Security
Remember what I said. You can use the same public key on many devices. I like to meet somewhere in the middle. I’ll make a key pair for a use case. One for VMs, one for LXCs, one for a very purposeful use case like maybe a DMZ server, etc.
It’s up to you. One thing you may have noticed though, is the “free and easy” nature of the private key. If anyone gets the key and knows the user name well then they can log in, unchallenged.
Private keys can be set with a passphrase, that forces a password to unlock/decrypt it before it can be used. Bitwarden doesn’t provide this option, but any Linux box can use OpenSSH to set one.
I copied my private key to a file and then chmod to 600. If you don’t change the permissions first:

So in my example: chmod 600 test
ssh-keygen -p -f test


Now, I copy that key back down:

You can also use Secure CRT to set a passphrase.
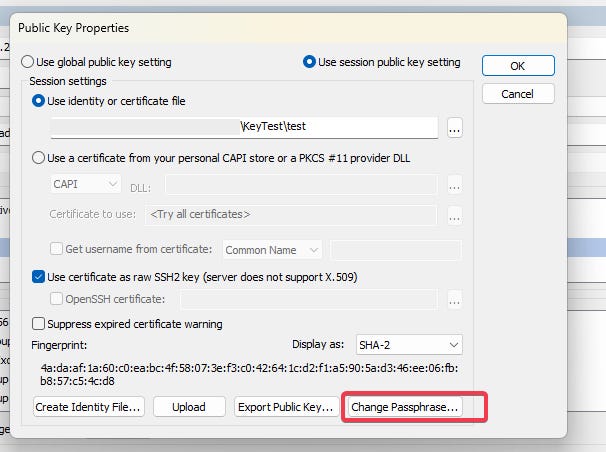
Be aware that SecureCRT will cache the passphrase once you’ve set it for ease of use. So if you doubt it worked, test on a fresh profile.
BONUS LEVEL
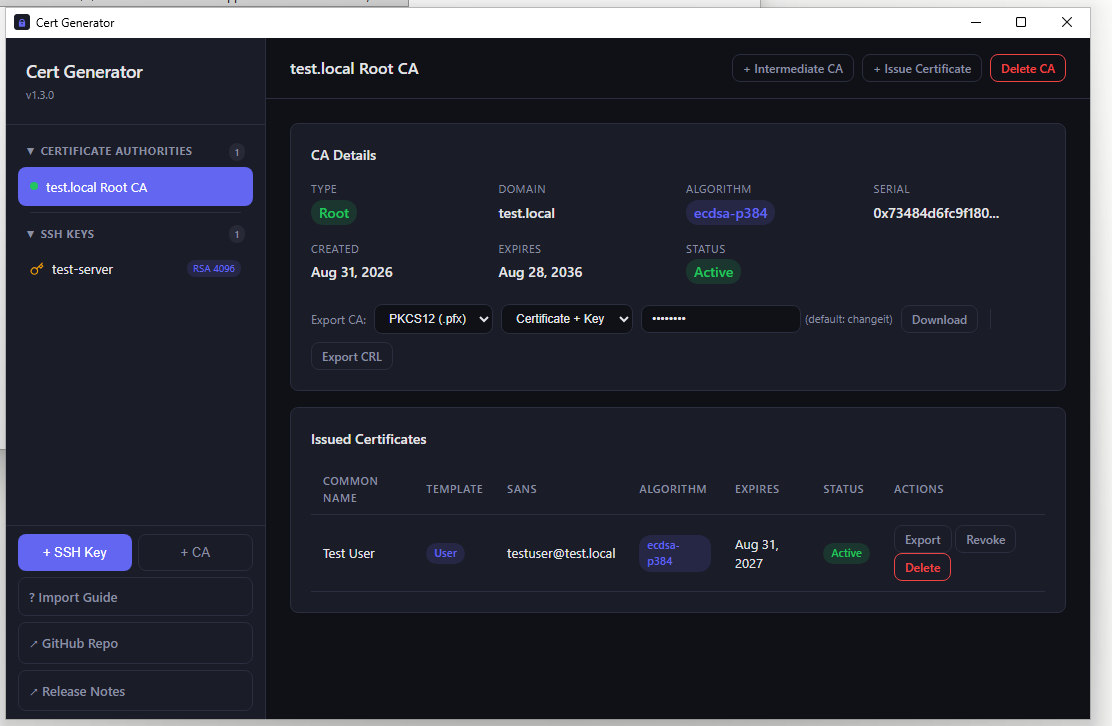
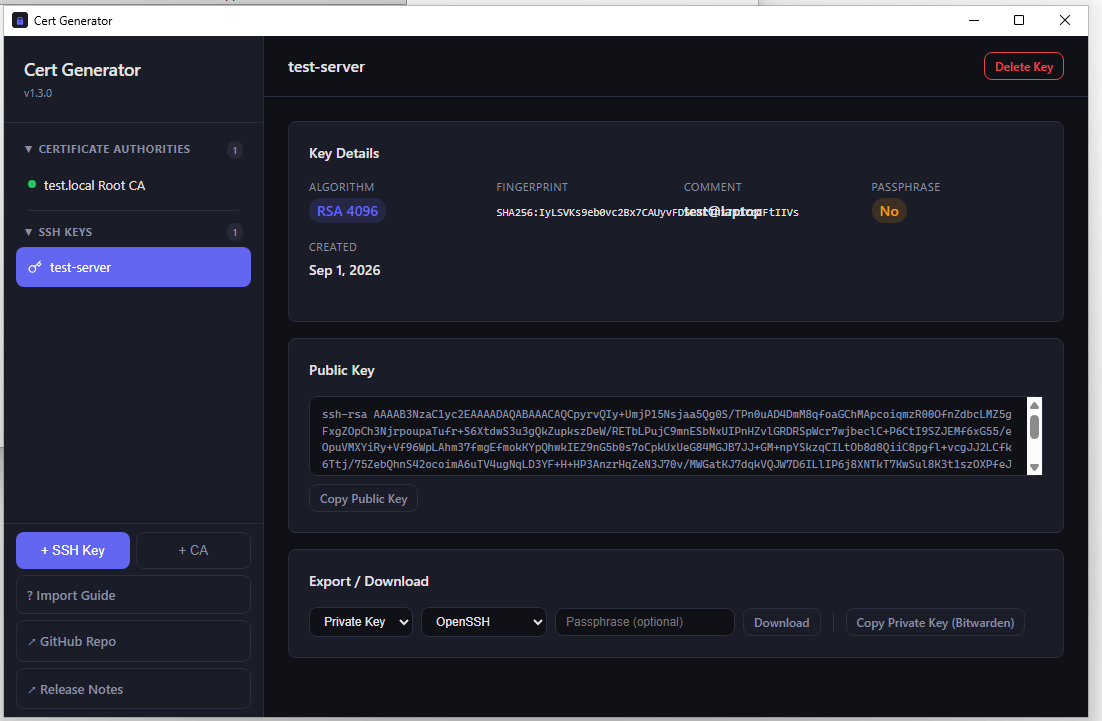
I find the aforementioned method of creating SSH Keys to be a pain, honestly. I vibed together an app that makes this process far easier. It can also handle actual certs as well. This and more of my tools can be found at my Github.
Conclusion
Ok, so I hope that laid everything out in an easy to understand and implement sort of way. It’s a much more secure and flexible way to connect to your servers.
Until next time.